
When you’re working on a project, you need to understand how your different tasks will affect when your project ends in order to reach important deadlines. To help manage those important dates, Microsoft Project offers functionality to allow Project Managers the option to enter/set a deadline for any task in the project schedule. Deadlines in Microsoft Project, and often overlooked feature, is a great way to alert you to problems in your project schedule. Project managers will often try to control the finish date of a task by setting the task’s finish date. But entering the finish date will only restrict (or constrain) the task, possibly preventing the task from moving freely, if needed.
If you want a task to finish on a certain date, but want to retain the flexibility of the schedule, based on dependencies, consider entering a deadline date for the task(s). Deadlines can be added to any task in the project schedule (summary tasks, important milestones, specific tasks on/off the critical path, etc.). Once the deadline date is entered/set, it quietly sits in the background waiting for task updates to cause the task’s finish date to exceed (go beyond) the deadline date, which will then trigger an indicator in the ‘Indicator’ column in Microsoft Project, (see image below). Deadlines can also be used to help further define your project’s critical path, without restricting (or constraining) tasks from moving freely, if needed.
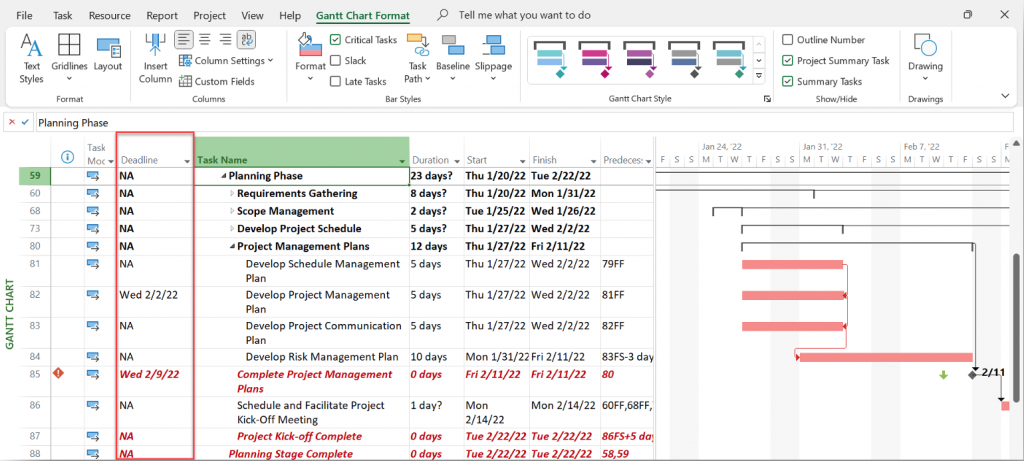
A Deadline is a target date indicating when you want a task to be completed. If the ‘Finish Date’ exceeds the ‘Deadline Date’ and the task is not completed, Microsoft Project displays an indicator. A deadline is also shown as an arrow in the Gantt Chart view
If the schedule for a task extends beyond the deadline date, an alert will appear in the Indicator field/column notifying you that the task is scheduled to finish later than the deadline date specified.
Apply a deadline to a task when you want to track a deadline for a specific task but don’t want to lock your schedule by setting a constraint such as ‘Must Finish On’ or ‘Finish No Later Than’.
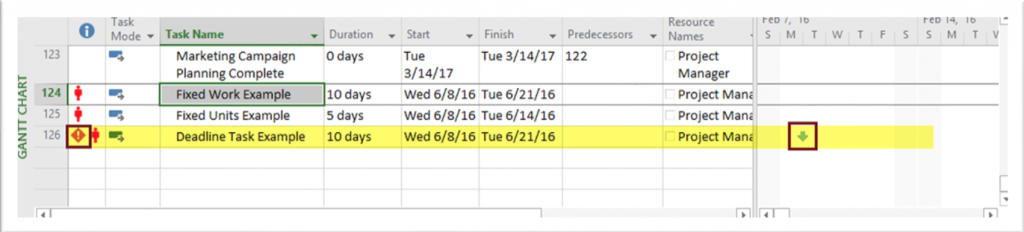
As shown in Figure 1, below, Deadline dates in Microsoft Project appear on the Gantt chart and are indicated by a green arrow. If a task exceeds its’ deadline, a red indicator appears in the ‘Indicator’ column for the affected task. Deadlines not only act as a warning if a task goes beyond its deadline date, they can also lead to non-critical tasks becoming critical, if the task’s finish date goes beyond the deadline date
‘Deadlines’ vs. ‘MFO’ (Must Finish On Constraint)
It is recommended to use Deadlines for due dates in your Microsoft Project schedule instead of entering the desired Finish date or a ‘Must Finish On’ (MFO) constraint. Allow the Finish date to be calculated from the Duration and the Start date of the task, then manually enter a Deadline for the due date in order to be notified if the task’s Finish date goes beyond the Deadline date for any reason. In addition, if the Deadline date is equal to or later than the Finish date, the Total Slack on the critical path is calculated to ‘0’, which automatically puts the affected tasks on the ‘critical path’.
As you can see from Figure 2 below, setting a Deadline date allows Microsoft Project to adjust the Finish date of a task, as needed.
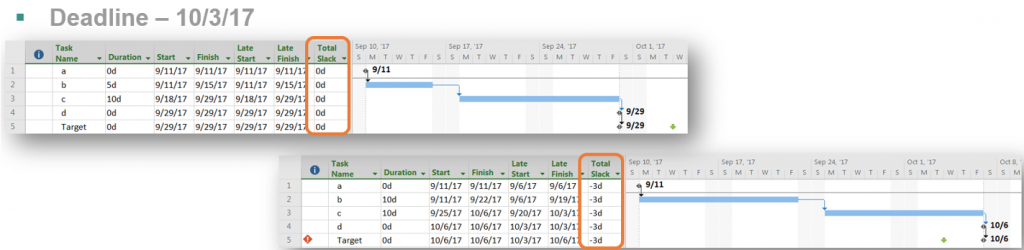
However, as shown in Figure 3, using a ‘Must Finish On’ (MFO) constraint prevents Microsoft Project from moving the project’s Finish date, as needed, which may cause the PM to miss attributing factors affecting the project’s end date.
While it is suggested that Deadlines are used to reflect and track due date for various tasks in the project schedule instead of a ‘Must Finish On’ (MFO) or ‘Finish No Earlier/Later Than’ (FNET/FNLT) constraint, it is also recommended to use 2 separate tasks in the project schedule to represent the end date of the project. One task, preferably a milestone task, with an associated Deadline to represent the target Finish date, and the other task, also a milestone and a successor to the task with a Deadline, has a ‘Must Finish On’ (MFO) constraint to represent the contracted or committed Finish date of the project. The reason we suggest using the ‘Must Finish On’ (MFO) constraint on one of the milestone tasks, is that using a Deadline will not allow you to see positive slack/float in the project schedule, where as a ‘Must Finish On’ (MFO) constraint renders a stable ‘critical path’ without the ‘critical path’ shifting whenever the project end date moves, and the slack/float is easily determined. In addition, when there is a ‘Must Finish On’ (MFO) constraint associated with the project’s end date and a change anywhere in the project schedule creates a conflict, a ‘Planning Wizard’ message, as shown in Figure 4, is presented to alert the user of the potential conflict.

How to set a ‘Deadline’ Date
There are two (2) methods available to set deadlines in an Microsoft Project schedule.
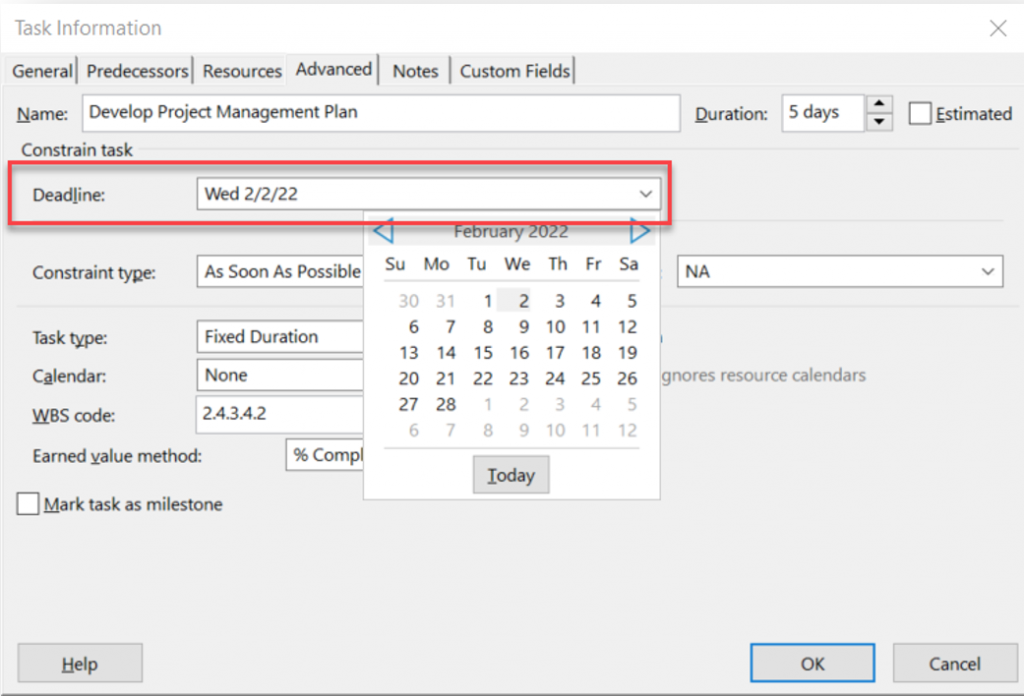
- From the Task Information dialogue box, on the ‘Advanced’ tab, enter the desired ‘Deadline Date’ in the ‘Deadline’ field for the selected task (Figure 5).
To set a Deadline from the Task Information dialogue box:
- Select the desired task(s), then go to Task (tab), then select Information (in the ‘Properties’ section of the menu ribbon; OR you may also access the Task Information dialog box by double-clicking on the task name
- In the Task Information dialogue box, select the Advanced tab
- Enter (or select from the drop-down calendar) the desired date in the Deadline field.
Insert the ‘Deadline’ column in the desired Gantt View in Microsoft Project and enter the desired ‘Deadline Date’ for the desired task (Figure 6).
Customizing ‘Deadline’ Indicators
The shape of the Deadline indicator can be changed by one of two ways:
Option 1:
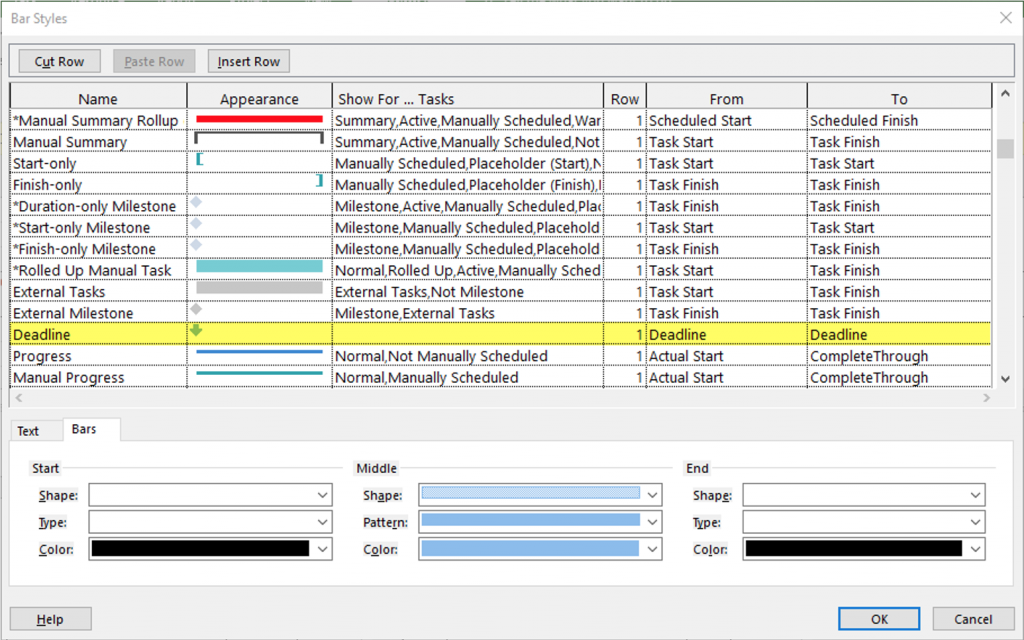
- While in a view with the Gantt Chart visible, go to Format >> Bar Styles
- Scroll down to the Deadline shape field,
- Customize the shape as desired (e.g., shape type and/or color)
- Click OK to apply
Option 2:
- Double-click on the Deadline indicator in the Gantt Chart View to edit its shape.
Summary
Deadlines in Microsoft Project allow the scheduler to monitor and track the forecasted finish dates for important tasks and milestones in the project schedule. Adding deadlines can provide valuable information to help keep the project on track. You may even want to try adding deadlines to represent contingency in the project schedule. For example, if the estimated Finish date of a task is Wednesday, 8/31/22, try entering a deadline of Friday, 9/1/22 to allow an extra 2 days to complete the task without affecting the project’s end date. There are several different ways to leverage the benefits of deadlines in your Microsoft Project Schedule. For example, if you require more notification than the out-of-box indicator, you can always create a custom field, using a formula and a graphical indicator (i.e., red flag) to display anywhere, in any Gantt Chart View, in your project schedule to represent whenever the task’s finish date goes beyond its deadline date. REMEMBER: Deadlines can add great value to your project schedule and CANNOT be overused in Microsoft Project!
For more information on how we can help you and your project management team, send us an email
If you are looking to kick start your project management journey, sign up for our Microsoft Training Classes. I hope you find this blog post helpful. For more tips and tricks on Project Management, follow us on LinkedIn and Instagram
GAIN VISIBILITY WITH PPMVUE
Bring your Project Online data to life with PPMVUE.
Create dashboards and reports for Portfolios, Projects and more in few clicks. Ready to use out of the box and works with any configuration
Download From Office Store Learn More