
The ‘Organizer’ within Microsoft Project (Standard and Professional) allows one to quickly copy various Microsoft Project objects (fields, groups, filters, calendars, tables, modules, reports, and views) from one Microsoft Project file or Enterprise Project schedule to another. Learn how leveraging the MS Project Organizer will help with your templates and elements.
In a Microsoft Project Server or Project Online environment, some users often build their own local MS Project elements (i.e., tables, fields, views, etc.) and want to share with other users.
NOTE: Project Online/Server Administrators may also use the MS Project ‘Organizer’ to copy elements from various project schedules to the Enterprise Global Template.
Using the MS Project ‘Organizer’
To use the ‘MS Project Organizer’ to share elements between project schedules (or the Enterprise Global Template for Microsoft Project Online/Server):
1. Open the project schedule with the desired elements
- Open the project with the desired elements to be copied (shared) in Microsoft Project (either ‘Read-Only’ or ‘Read-Write’ mode)
2. Open the ‘receiving’ project schedule
- Open the project schedule to receive the desired elements, also in Microsoft Project.
WARNING: The ‘receiving’ project schedule MUST be opened in ‘Read-Write’ mode to copy the elements to the project and save the changes.
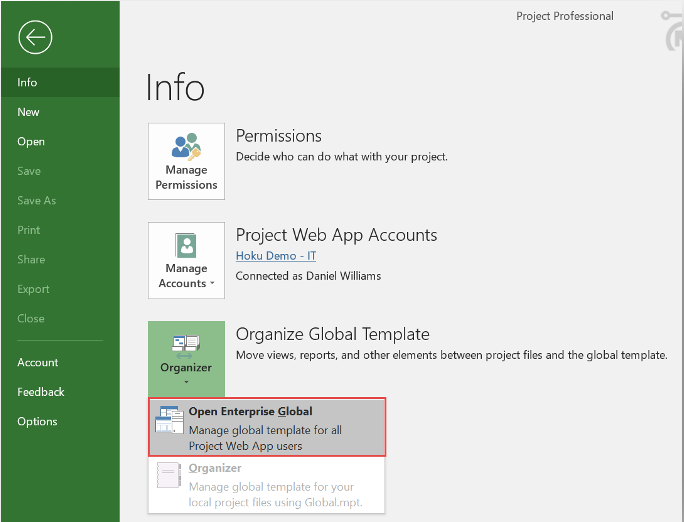
TIP: While connected to Project Online/Server, Administrators may copy desired elements (from either local or enterprise projects) to the Enterprise Global Template by opening the Enterprise Global Template as the receiving project schedule, by navigating to:
- File >> Info >> Organizer (‘Organize Global Template’ dropdown menu) >> ‘Open Enterprise Global’
3. Open the MS Project ‘Organizer’
- Navigate to: File >> Info >> Organizer (‘Organize Global Template’ dropdown menu) >> ‘Organizer’

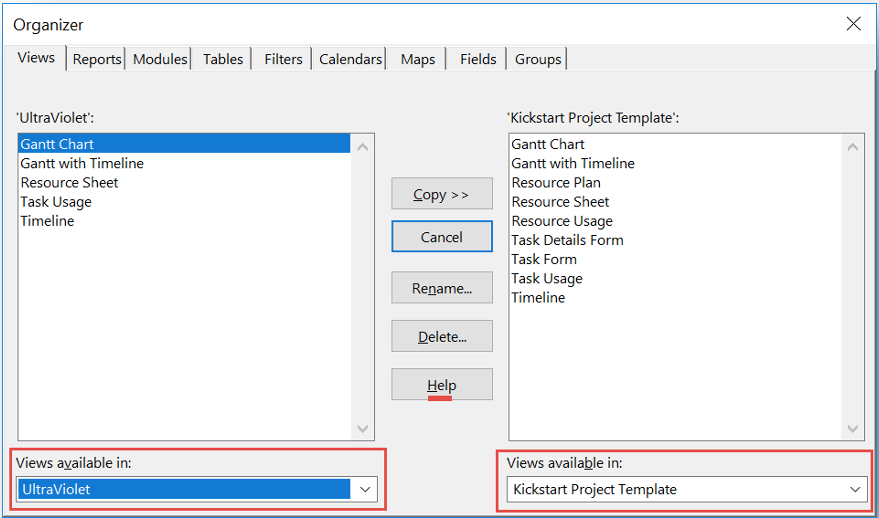
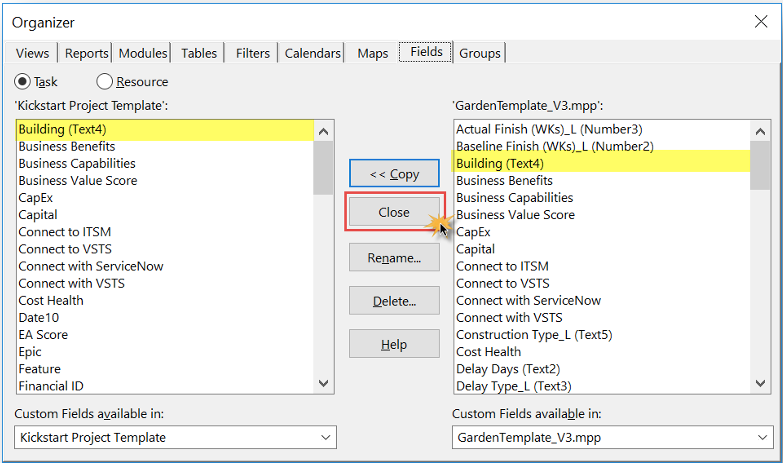
4. Setup ‘…available in’ lists (i.e., Views available in)
- In the ‘Organizer’ Dialogue Box, ensure the ‘sending’ project schedule is selected in one of the ‘… available in’ boxes (left or right), depending on the tab selected (i.e., ‘Views available in’, if the ‘Views’ tab is selected) and the ‘receiving’ project schedule (or ‘Global.MPT’ or Enterprise Global Template, if Project Server Administrator) is selected in the other.
5. Copy desired elements
- Select the tab associated with the element to be copied (i.e., if copying a table, select the ‘Tables’ tab).
- With the appropriate tab selected, select the element name (i.e., Table name) from the ‘sending’ schedule.
- Click the ‘Copy >>’ or ‘<< Copy’ button (depending on which project was selected first, to copy the selected element to the ‘receiving’ project.
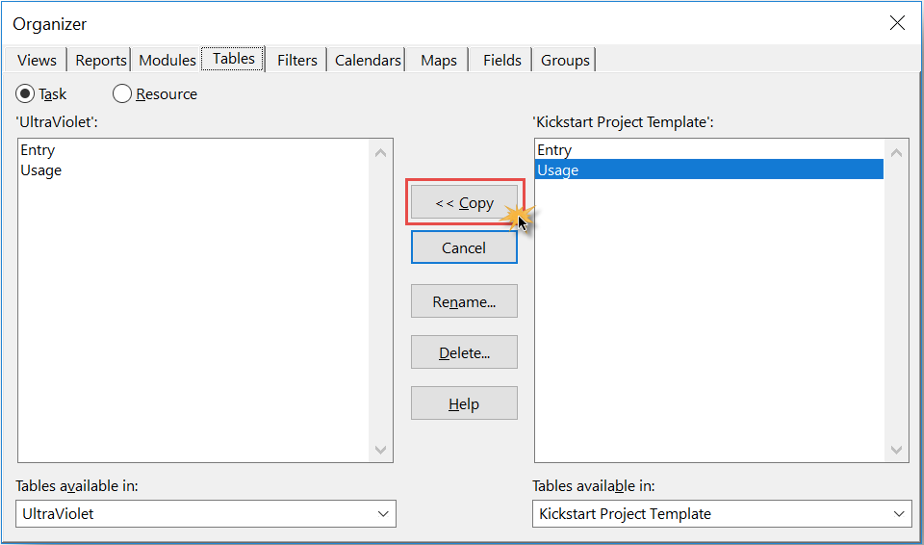
NOTE: The direction of the arrows in the ‘Copy’ button (i.e., >> (right) or << (left)) determines on which project is selected first from the ‘… available in:’ lists. The ‘sending’ project is selected first, which will direct the ‘Copy’ arrows to automatically point to the ‘receiving’ project.
WARNING: If copying a View, copy Field(s) (if applicable), then ‘Groups’ (if applicable), then ‘Filters’ (if applicable), then ‘Tables’, then ‘Views’, since an MS Project View can be comprised of those elements
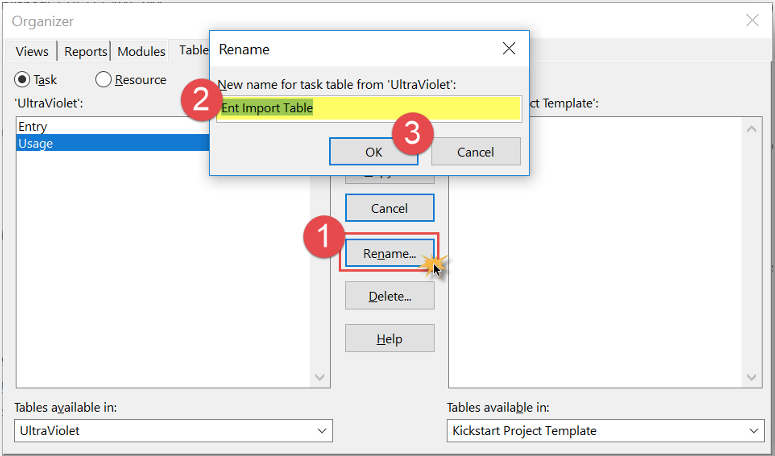
6. Rename ‘copied’ elements (optional)
- Rename the copied element by:
- Selecting the ‘copied’ element from the receiving project, then clicking the Rename… button.
- Entering a new name for the element (i.e., ‘Enterprise Import Table’)
- Clicking OK.
NOTE: Renaming is OPTIONAL if you are not copying elements to the Enterprise Global Template; however, renaming is MANDATORY if you are copying elements to the Enterprise Global Template.
7. ‘Copy’, ‘Rename’ & repeat for remaining elements
- Select the tab associated with the remaining elements to be copied (i.e., if copying a table, select the ‘Tables’ tab).
- With the appropriate tab selected, select the element name (i.e., Table name) from the ‘sending’ schedule.
- Click the ‘Copy >>’ or ‘<< Copy’ button (depending on which project was selected first, to copy the selected element to the ‘receiving’ project.
- OPTIONAL: Rename the copied element by:
- Selecting the ‘copied’ element from the receiving project, then clicking the Rename… button.
- Entering a new name for the element (i.e., ‘Enterprise Import Table’)
- Clicking OK.
8. Close the ‘Organizer’ and ‘Save’ your changes
- After all of the desired elements have been copied, click Close, to close the ‘Organizer’ Dialogue Box.
- Test to ensure that the new elements are visible and available in the ‘receiving’ project.
- Save, close (and check-in, if an Enterprise Project) the ‘receiving’ project to save the latest changes.
- Close (without saving changes) the ‘sending’ project.
Leveraging the MS Organizer: Summary
Using the MS Project ‘Organizer’ can be a major help in both building templates and making already-built elements in other project schedules easily available and easily shared between users, which is beneficial when users want to share those elements with each other.
One of the greatest features of the MS Project ‘Organizer’ is that either side’s bottom drop-down list can switch to ‘Global.mpt’. Which means you can copy various elements from one (1) project schedule to your local machine, so whenever you open a project schedule in Microsoft Project on your machine, the copied elements (i.e., views, tables, custom fields, etc.) are available. The MS Project ‘Organizer’ is also a handy way to delete elements (i.e., views, tables, filters, etc.) that were accidentally created or are no longer needed. One of the lesser-known and even lesser-used features in Microsoft Project, the ‘Organizer’ can be leveraged in many ways to help making existing elements available to all users, without each user having to create and customize their own.
For more information on how we can help you and your project management team, send us an email
If you are looking to kick start your project management journey, sign up for our Microsoft Training Classes. We hope you find this blog post helpful. For more tips and tricks on Project Management, follow us on LinkedIn and Instagram
GAIN VISIBILITY WITH PPMVUE
Bring your Project Online data to life with PPMVUE.
Create dashboards and reports for Portfolios, Projects and more in few clicks. Ready to use out of the box and works with any configuration
Download From Office Store Learn More