‘Auto-Approval’ Rules Overview
The Approval Center page provides a place for Project Managers and (Task) Status Managers to view and update the task changes submitted to them by resources back into the appropriate Microsoft Project schedules. The ‘Approvals’ page provides an approval gateway for the Project or Status Manager, allowing them to review and process task changes submitted by project resources before they are synchronized with the Microsoft Project schedule(s) as part of the updating process.
Some of the benefits of the Project Online ‘Approval Center’ include (but not limited to):
- Previewing submitted task updates for approval or rejection
- Accepted updates are included in the project schedule upon the next publish
- Auto-approval rules can be created and managed from the ‘Approval Center’

Inside the Approval Center, Project and Status Managers can ‘auto-approve’ updates by utilizing the ‘Manage Rules’ option, located on the ‘Navigate’ section of the ‘Approvals’ menu ribbon in PWA.

The Approval Center’s ‘Manage Rules’ feature provide Project and Status Managers the ability to customize auto-approval rules, by the following categories:
- All New Task and Assignment Requests (via the ‘Create New Task’ or ‘Add Yourself to Task’ feature)
- All Task Reassignment Requests (via the ‘Reassign Task’ feature)
- All Assignment Delete Requests (via the ‘Remove Task’ feature)
- Task Updates (via actual hours worked submitted in PWA’s ‘Task Center’ or ‘Timesheets’)
- All Updates listed above, and…
- Where updated field matches a field in the published project, or
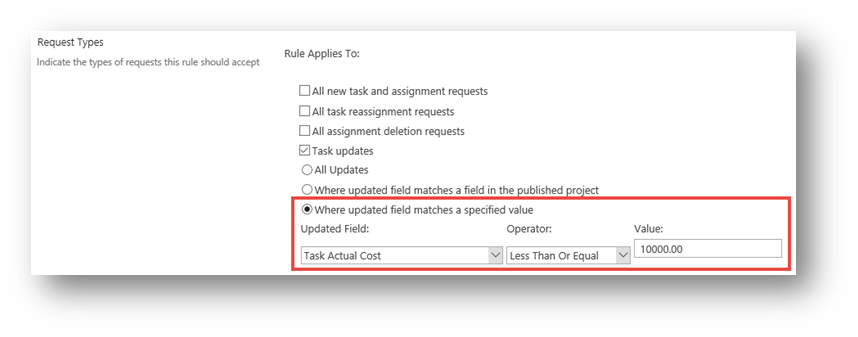
- Where updated field matches a specified value

Further to the ‘Task Updates’ option, managers can elect to auto-approve ‘All Task Updates’ or specify the updates to be approved by the specified criteria. Managers have two (2) options in which they can specify which ‘Task Updates’ to be automatically approved:
- Specify task updates by conditions based on the value of a published field, such as processing task updates where the ‘Updated Field’ (i.e. ‘Task Actual Costs’), meets a specific ‘condition’ (i.e. ‘Less Than or Equal’), in a specified published field (i.e. ‘Task Baseline Cost’). Which translates, to ONLY process task updates where the ‘Actual Cost’ (for the task) does NOT exceed the ‘Baseline Cost’ (for the task)

- Specify task updates by conditions based on specified value, such as processing task updates where the ‘Updated Field’ (i.e. ‘Task Actual Costs’), meets a specific ‘condition’ (i.e. ‘Less Than or Equal’), of a specified value (i.e. ‘$10,000). Which translates, to ONLY process task updates where the ‘Actual Cost’ (for the task) does NOT exceed $10,000 (for the task).

In addition, to customizing the approval categories, the Project and Status Manager may also customize how the automatic updates are processed. As a result, managers may elect to ‘Automatically run the rule’, and/or ‘Automatically publish the updates’ after the updates have been processed.

And finally, managers can elect to process ‘All current and future projects’ or ‘Specific projects’ for which to apply the rule, and/or ‘All current and future resources’ or ‘Specific resources.

Once the rule is customized, managers can ‘Save’ to create or save edits made to an existing rule.
Auto-Approval rules are specific to the user’s account. As a result, Auto-Approval rules cannot be created in bulk on behalf of a group of users. Project Server/Online’s ‘Delegation’ feature must be used to create Auto-Approval rules on behalf of individual users.
To learn more on using ‘Auto Approval’ Rules for Task Updates in Project Server and Project Online, be sure to check out these other articles:
- Creating ‘Auto-Approval’ Rules
- Running a Pre-Defined ‘Auto-Approval’ Rule
- Copying an Existing ‘Auto-Approval’ Rule
- Deleting an Existing ‘Auto-Approval’ Rule
For more information on how we can help you and your project management team, send us an email
If you are looking to kick start your project management journey, sign up for our Microsoft Training Classes. We hope you find this blog post helpful. For more tips and tricks on Project Management, follow us on LinkedIn and Instagram

