
The purpose of What-If Scenarios is to adjust a project schedule’s timeline for a more favorable solution by imposing management constraints and/or changing execution variables; such as resources, implementation approach, priorities, etc.
When a project schedule is first created, tasks and durations are linked to form a ballpark project duration. The schedule tasks are usually linked as waterfall events. Resources are then assigned to get a feel for what skill set is need, when they need to perform their tasks, and for how long. Version 1.0 of the project schedule is to get an idea of what it will take to execute the project.
Usually management would like to reduce the cost, bring in the schedule, or mitigate risks to better coincide with management’s expectations and business drivers. By applying these drivers to the schedule through scenarios, you can analyze the schedule impact. By comparing scenarios, you can weigh the risks vs. the value of the schedule options and decide on which schedule best fits the business drivers and the project as a whole.
Once What-If Scenarios are performed, resource loading and leveling can be performed to create a more realistic project schedule.

How to create What-If Scenarios
1) Create the initial Project schedule:
Prior to creating What-If Scenarios, the project schedule should be created and reviewed. This schedule must contain all the components of the work breakdown structure, realistic durations, and milestones. Resource assignments are optional, but task owners are essential. By identifying the task owners in a text field, we can see what areas/departments are impacted by the scenario. Also, contingency tasks should be applied to areas that have significant risks that may jeopardize the delivery target date.
This project schedule should be approved by the sponsor and a baseline taken for future What-If Scenario reporting.
Leveling resources is recommended after the What-If Scenario process is performed and a schedule is selected to move forward with. Performing resource leveling prior to What-if Scenarios will be a waste of time and energy, since the tasks and their order may be changing.
2) Build your What-If Scenario Team:
The What-If Scenario team should consist of the Project Sponsor, Project Manager (PM), and Subject Matter Expert (SME), at a minimum. While the Project Sponsor discusses the scenarios to meet the business need, the SME applies reality to the request, while the PM applies the scenarios to the project schedule and reports on the changes and risks.
It is important to determine What-If Scenario development timeframe. Since the What-If Scenario process is iterative, it’s good to determine how much time will be allocated to this process and when a decision needs to be made. Usually 1-2 weeks is a good duration for this task.
3) Document What-If Management Assumptions and Definitions:
Documenting Management Assumptions for the What-If Scenarios provides a guideline that remains constant throughout the what-of scenario creation and reviews. Assumptions may include process prerequisites, priorities, dependencies, contingencies, etc.
Definitions also should be documented to ensure everyone is talking about the same thing. For example, when we talk about “shutdown”, what exactly does that mean? What does “production support” consist of? Common terminology will be beneficial when discussions are underway and the What-if Results are reviewed.
The assumptions and definitions should be listed with numeric bullets to be easily referenced.
4) Identify Planned Contingencies:
The contingency tasks in the initial project schedule should be reviewed and approved by the SME and Project Sponsor. The understanding of what the contingency is used for and when it should be used is vital to reviewing What-If Scenario impacts; especially if the What-If Scenario parameters are aggressive.
The contingency tasks should be listed in a table that clearly defines what the contingency is and why was it added to the schedule. Since contingency is used to mitigate risks, it’s also important to rank (high, medium, low) the likelihood it would be used and to also rank (high, medium, low) the impact to the schedule.
For further definition and grouping, a Category information can be used. For example: documenting the area or department the contingency is defined for.
5) Create What-If Scenarios:
Based on the management assumptions and definitions, scenarios can be created to see how the project schedule may be impacted to achieve management’s objectives. One or more of the following can drive the schedule in support of management objectives:
- Reduce duration
- Reduce risk
- Increase quality
- Reduce cost
- Hard end date
- Constrained resources
By doing the above, the project may see a decrease/increase in costs, resources, and/or scope.
Here are some examples of generic scenarios:
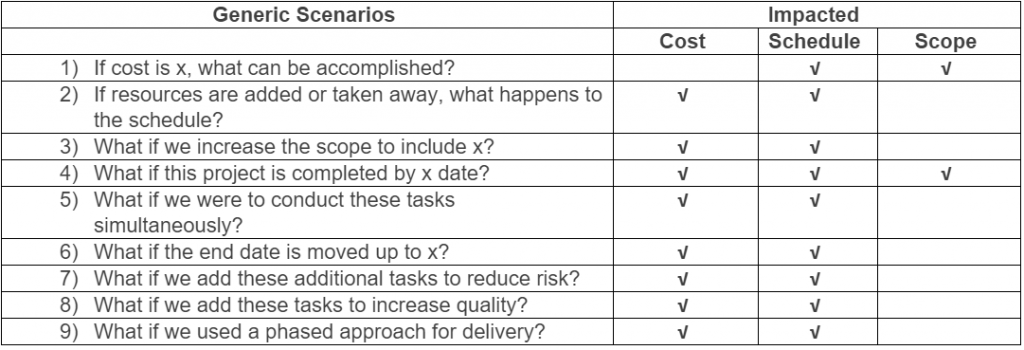
You may have different scenarios than what is listed above. There can also be combinations of scenarios. The scenarios may also be very specific depending on the project and the strategy for meeting management’s objectives.
The scenario definition and results review is an iterative process. Depending on the results, the scenario may need to be adjusted and/or re-evaluated.
It is important that no more than 2-3 scenarios are analyzed. This is a very demanding process and the less scenarios that are being investigated the more value will be derived from the What-If Scenario process.
For a more efficient scenario application, update the project schedule with task items that can easily control the What-If Scenarios with predecessor changes or inactivation. It’s best not to use the existing project tasks to do this, so you can drop back to the original state of the project schedule.
6) Identify Milestones for Reporting:
To compare the scenarios and their impact to the schedule, it is important to identify milestones to monitor and report. These milestones should focus on key project deliveries. This should result in no more than 7-8 milestones.
The milestones should be of business value and/or may result in a business decision. For example: Production-Stop, Production-Start-Up, and Okay-To-Ship, are all milestones that impact the business directly and may cause further discussions and decisions.
If there are different product lines in the schedule, the milestones should be the same in each product line to compare the products’ progress.
The milestone identification should be approved by the project sponsor, who is responsible for reporting progress to their management.
As the What-If Scenario analysis proceeds, these milestones may change. If the milestones do change, the project sponsor may want to re-run scenarios to capture the changed output.
7) Define the What-If Results reporting Format:
Now that the What-If Scenarios are defined and the reporting milestones are identified, we can start applying the scenarios to the project schedule and report on the results.
Before applying the scenarios, make sure a baseline is taken of the schedule. This should be captured in Baseline 0 and Baseline 1. Baseline 1 will maintain the history of the project schedule, while Baseline 0 will be over-written by MS Project when the next baseline is taken. If another baseline is taken, make sure that it is also saved in Baseline 2, and so on.
There are 2 ways to report schedule impacts:
- Variance Matrix
- Timeline (showing baseline and current milestones)
For the Variance Matrix, list the milestones that were agreed upon for reporting. Put the date of the baseline in the header and record the baseline dates. When the results of the first scenario results are ready, update the Scenario # and date and record the scenario dates.
The variance is calculated Baseline date minus Scenario date. Note any risks that are associated with this date change.
You may also want to add a box to list the Scenario Variables that are covered with the new scenario dates.
A timeline is used to visually show the differences between the baseline and scenario output. To have the baseline dates show in the Timeline View, put a section at the end of the project schedule for displaying baseline critical milestones, then manually enter the baseline dates. Build the timeline in MS Project, copy it to PowerPoint and add the arrows. Green arrows if the dates came in (Milestone 2), red arrows if the date goes out (Milestones 1 and 5). If there are no arrows, there may not be a baseline (Milestone 4) or the baseline is the same as the planned (Milestone 3).
8) Next Steps:
After reporting on the scenario, the project sponsor may want to adjust the scenario or create a new one. This iterative process of What-If Scenario development will continue until the sponsor is satisfied with the schedule; within the What-If Scenarios process timeframe. It is important to manage the process within the agreed to timeframe, so the What-if analysis doesn’t drag on.
- Next steps may include tasks for the continuation of the What-If Process
After reporting on multiple scenarios, the sponsor should pick the schedule that is the most realistic; where the risks are manageable.
- Next steps may include resource loading and leveling and re-baselining
Loading and leveling the resources is also an iterative process. This can be done while What-If Scenarios are being developed or afterwards. If done in parallel, the results must be merged, so that the Project Sponsor can see the full effect to the project schedule. Resource leveling must be performed with the resource managers and then presented to the Project Sponsor. More than likely, the schedule will move, but should be as close to the scenario dates as possible.
When the Project Sponsor approves the schedule, another baseline is taken, and the progress reporting begins!
For more information on how we can help you and your project management team, send us an email
If you are looking to kick start your project management journey, sign up for our Microsoft Training Classes. We hope you find this blog post helpful. For more tips and tricks on Project Management, follow us on LinkedIn and Instagram
GAIN VISIBILITY WITH PPMVUE
Bring your Project Online data to life with PPMVUE.
Create dashboards and reports for Portfolios, Projects and more in few clicks. Ready to use out of the box and works with any configuration
Download From Office Store Learn More