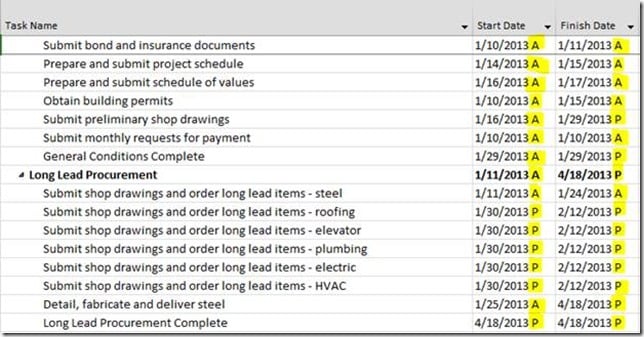
If you regularly show ‘Actual Start‘ and ‘Actual Finish‘ dates alongside ‘Start‘ and ‘Finish‘ dates in order to show what has actually happened, here is a display technique that can save you some real estate in a view or report: placing a “P” next to the date to indicate that it is still planned or an “A” next to the date to indicate that it is actual.
Implementing this technique is as simple as creating two custom fields (‘Start Date‘ and ‘Finish Date‘), it can be implemented for projects or tasks, and it can be implemented in MS Project, Project Server, or Project Online.
Following is the procedure for creating custom ‘Start Date’ and ‘Finish Date’ task fields in MS Project; you can use similar settings and formulas for creating these fields as task or project enterprise custom fields in PWA.
Note: You must use names other than ‘Start’ and ‘Finish’ for these custom fields, since the ‘Start’ and ‘Finish’ names are reserved for internal use by MS Project, Project Server, and Project Online.
1. Click the ‘Project’ tab to display the ‘Project’ ribbon, then click the ‘Custom Fields’ button.
2. In the ‘Field’ section of the ‘Custom Fields’ dialog box, select the ‘Task’ option.
3. In the ‘Type’ section of the ‘Custom Fields’ dialog box, select the ‘Text’ option.
4. In the field list section of the ‘Custom Fields’ dialog box, select an unused text field, and click the ‘Rename’ button.
5. In the ‘Rename Field’ dialog box, enter ‘Start Date’ and click the ‘OK’ button.
6. In the ‘Custom attributes’ section of the ‘Custom Fields’ dialog box, click the ‘Formula’ button.
7. In the text area of the ‘Formula for Start Date’ dialog box, enter the following formula, then click the ‘OK’ button:
IIf([Actual Start]=projdatevalue(“NA”),datevalue([Start]) & ” P”,datevalue([Start]) & ” A”)
8. In the ‘Calculation for task and group summary rows’ section of the ‘Custom Fields’ dialog box, select the ‘Use formula’ option.
9. In the ‘Calculation for assignment rows’ section of the ‘Custom Fields’ dialog box, select the ‘None’ option.
10. In the ‘Values to display’ section of the ‘Custom Fields’ dialog box, select the ‘Data’ option.
11. In the field list section of the ‘Custom Fields’ dialog box, select another unused text field, and click the ‘Rename’ button.
12. In the ‘Rename Field’ dialog box, enter ‘Finish Date’ and click the ‘OK’ button.
13. In the ‘Custom attributes’ section of the ‘Custom Fields’ dialog box, click the ‘Formula’ button.
14. In the text area of the ‘Formula for Start Date’ dialog box, enter the following formula, then click the ‘OK’ button:
IIf([Actual Finish]=projdatevalue(“NA”),datevalue([Finish]) & ” P”,datevalue([Finish]) & ” A”)
15. In the ‘Calculation for task and group summary rows’ section of the ‘Custom Fields’ dialog box, select the ‘Use formula’ option.
16. In the ‘Calculation for assignment rows’ section of the ‘Custom Fields’ dialog box, select the ‘None’ option.
17. In the ‘Values to display’ section of the ‘Custom Fields’ dialog box, select the ‘Data’ option.
18. Click the ‘OK’ button to close the ‘Custom Fields’ dialog box.
19. Insert the two newly created ‘Start Date’ and ‘Finish Date’ fields into any task table you wish, and hide the existing ‘Start’ and ‘Finish’ fields if they are present.
Note: Since these fields are automatically calculated, you will not be able to enter dates into them; if you need to do that (such as when you may be using manually scheduled tasks), then you will need to create a table that exposes those fields.
Good luck!


