
Understanding Duration
In the default Gantt Chart view, Microsoft Project automatically displays a Duration column to the right of the Task Name column. So, a good question to ask is, “What is Duration?”. According to the Project Help article about Duration in Microsoft Project 2013, Duration is “…the total span of active working time for a task. In this blog you will learn everything you need to know about duration.
This is generally the amount of working time from the start to the finish of a task.” There are other ways to describe Duration as well. For example, I like to describe Duration as the “window of time” during which work is performed on a task. In Microsoft Project, the Duration field is an unusual field because the software allows you to do either of the following:
- Manually enter a value in the Duration field
- Assign a resource to a task, enter a Units value and Work value for the resource, and then let the software calculate the Duration for you
If you want to manually enter a Duration value for a task, Microsoft Project allows you to enter the Duration value in the following time units: Minutes, Hours, Days, Weeks, or Months. For example, Figure 1 shows a project in which I entered a Duration value using each of these time units.
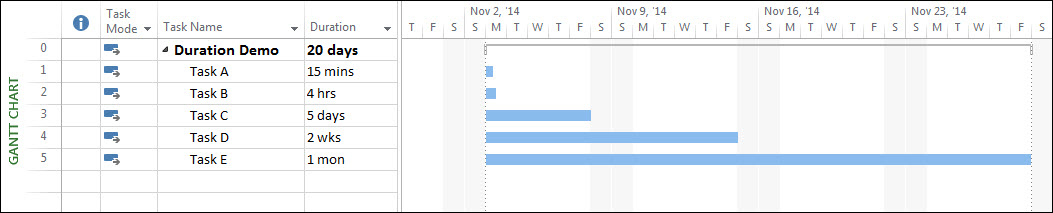
Figure 1: Duration values entered for tasks
There is no problem with manually entered Duration values. In fact, in some companies the preferred methodology during task planning is to estimate task Duration values. The only “gotcha” about which I want to warn you is when you enter a Duration value in months. What is a month? To most of us, we would assume that a month is the span of working time from the first day of the month to the last day of the month.
Using December 2014 as an example, we would assume that a month would run from Monday, December 1, through Friday, December 31. Unfortunately, this is not how Microsoft Project thinks about months.
In all versions of Microsoft Project, including the 2013 version, a month is defined by default as a time span of 20 working days. To see this definition in Microsoft Project 2010 or 2013, click the File tab, click the Options tab in the Backstage, and then click the Schedule tab in the Project Options dialog. In the Calendar options for this project section of the dialog, the software includes the Days per month field.
Notice in the Project Options dialog shown in Figure 2 that the default value is 20 days in the Days per month field. In other words, to Microsoft Project, one month is equivalent to four work weeks or 20 working days. You can actually see this if you refer back to Figure 1 and look at the schedule of the Task E task, which is 1 month.
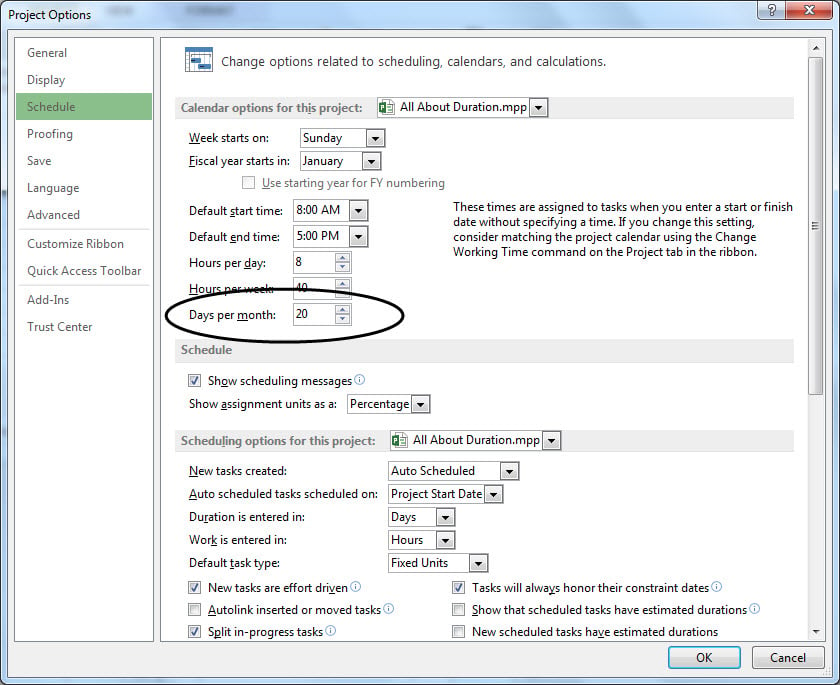
Figure 2: Days per month setting in the Project Options dialog
In Microsoft Project 2013, the software will allow you to change the value in the Days per month field to a maximum value of 100 days! This makes no sense, by the way. In the real world, we normally change the value in the Days per month field to either 21 days or 22 days as needed in each project.
Because Microsoft Project’s definition of a “month” is so rigid, I want to warn you about entering Duration values in months. Rather than entering Duration values in months, I would recommend that you enter Duration values in days or weeks instead to give you the flexibility you desire.
Leading Practice: When you manually enter Duration values, I recommend that you be consistent in your use of time units. For example, enter all of your Duration values in Days or Weeks, but do not mix Days, Weeks, and Months in the same project as this can lead to confusion with your team members and project stakeholders.
Understanding Elapsed Durations
When you enter a Duration value for a task in Microsoft Project, the software always calculates the schedule of the task in working days. For example, a Duration value of 10 days indicates a time span of 10 working days, calculated according to the schedule of the Project Calendar specified for your project.
The software gives you an additional method for entering Duration values known as “elapsed Durations.” When you enter an elapsed Duration value for a task, Microsoft Project calculates the schedule of the task in calendar days, and ignores all nonworking time such as weekends and company holidays. For example, an elapsed Duration value of 20 days means 20 calendar days, including weekends and company holidays.
You can enter elapsed Duration values in minutes, hours, days, weeks, or months. To enter an elapsed Duration value, simply prefix the time unit with the letter “e”, such as 5 eDays. By the way, most people enter elapsed Duration values in days. For example, suppose that I have a task named Ship Equipment to India and I expect the task to complete in 4 calendar days. In this case, I would enter the Duration value as 4 eDays.
This means that if I ship the equipment to India on Friday, it will arrive the following Monday because the elapsed Duration includes the Saturday and the Sunday. In situations like this, using elapsed Durations can be a very useful technique for scheduling your project. However, I also want to warn you about two possible negative consequences with using elapsed Durations in your projects:
- Elapsed Durations are measured in 24-hour days, not 8-hour days.
- Entering a Duration value in eMonths may not generate the schedule you expect.
Because Microsoft Project measures elapsed days as 24 hour days, this means that if you assign a human resource to a task with an elapsed Duration value, the software assigns the human to work 24 hours/day, even though the resource’s calendar shows that they only work 8 hours/day.
For example, notice in Figure 3 that I assigned Mickey Cobb to work full time (the Units value is 100%) on the Task A task which has an Duration of 5 eDays. Notice in the Task Form pane that Microsoft Project calculated that she will perform 120 hours of work during those 5 elapsed days, rather than the 40 hours we might expect. Because of this, I strongly recommend that you never assign human resources to tasks with an elapsed Duration.
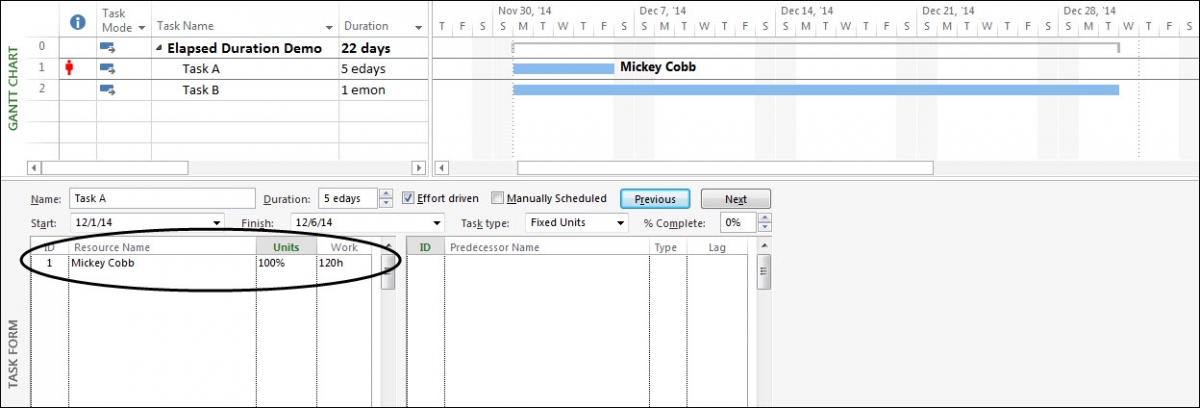
Figure 3: Resource assigned to a task with an elapsed Duration
If you enter a Duration value in elapsed Months, Microsoft Project always measures the elapsed month as exactly 30 calendar days. This means if you schedule a task to start on February 1 with a Duration value of 1 eMonth, the task ends in March and not on February 28 or 29 as you would expect. If you schedule a task to start on December 1 with a Duration value of 1 eMonth, the task ends on December 30, not on December 31. You can see this in the schedule of the Task B task shown previously in Figure 3.
To make matters worse for us when using elapsed Durations, there is no setting in Microsoft Project (not even the Project Options dialog) where you can change the definition of an elapsed Month. This means that the software will always calculate an elapsed Month as 30 calendar days and you cannot change it. Because of this inflexibility, I do not recommend you use elapsed Months as Duration values. Instead, focus on using elapsed Days or elapsed Weeks rather than elapsed Months.
Interested in how EPMA can help your schedules? Contact us today at 1.888.444.EPMA or enroll for one of our training classes.
Please feel free to leave comments below or check out our other blogs on Microsoft Project, Project Server, SharePoint and Project Management Methodology.
For more details & kick start your project management journey, sign up for our Microsoft Training Classes or send us an email.
Follow us at @EPMAinc, Linkedin, or Facebook
GAIN VISIBILITY WITH PPMVUE
Bring your Project Online data to life with PPMVUE.
Create dashboards and reports for Portfolios, Projects and more in few clicks. Ready to use out of the box and works with any configuration
Download From Office Store Learn More