Background Information
During a Microsoft Project 2013 Essentials training class with one of our clients this week, one of my wonderful students asked a question that is worthy of a blog post. He asked, “How can I level resource overallocations across multiple projects when the PMO has changed the priority of my projects?” This is a terrific question, as it takes leveling from a single-project basis to a multi-project basis, and requires at least one trick to make the process work. To level cross-project overallocations for multiple projects taking into account priorities set by the PMO, the general process is as follows:
1. Set leveling options to consider the Priority number first during the leveling operation.
2. Open every project and set the Priority number for each project.
3. Level overallocations using the Resource Usage view.
Set Leveling Options
The first step in the process is to set the leveling options so that Microsoft Project will consider the Priority number first in the leveling operation. In the 2010 and 2013 versions of the software, complete the following steps:
1. Click the Resource tab to display the Resource ribbon.
2. In the Level section of the Resource ribbon, click the Leveling Options button. Microsoft Project displays the Resource Leveling dialog.
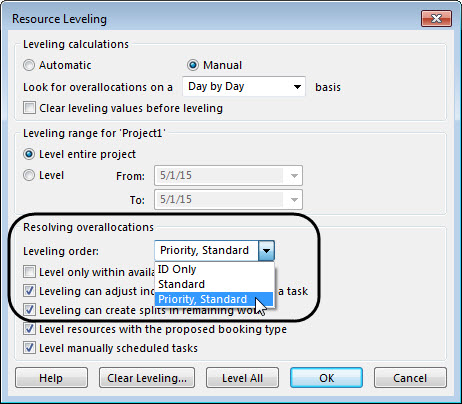
3. In the Resolving overallocations section of the Resource Leveling dialog, click the Leveling order pick list and select the Priority, Standard option as shown in the following figure.
4. Click the OK button.
Selecting the Priority, Standard option forces Microsoft Project to first consider the Priority number of each project when it applies the five factors used to determine which tasks to delay or split to level resource overallocations. This means that higher priority projects experience the least schedule changes during the leveling process, while lower priority projects experience the most schedule changes, as you might reasonably expect.
Open Each Project and Set the Priority Number
Based on the project priorities established by the PMO, the next step in the process is to open each project and to set a Priority number that corresponds with the priorities set by the PMO. For example, suppose that the PMO has established the following priorities for these three projects:
Module B Development High priority
Module A Development Medium priority
Module C Development Low priority
To set the project priorities using the example shown above, complete the following steps:
1. Open the high-priority project.
2. Click the Project tab to display the Project ribbon.
3. In the Properties section of the Project ribbon, click the Project Information button.
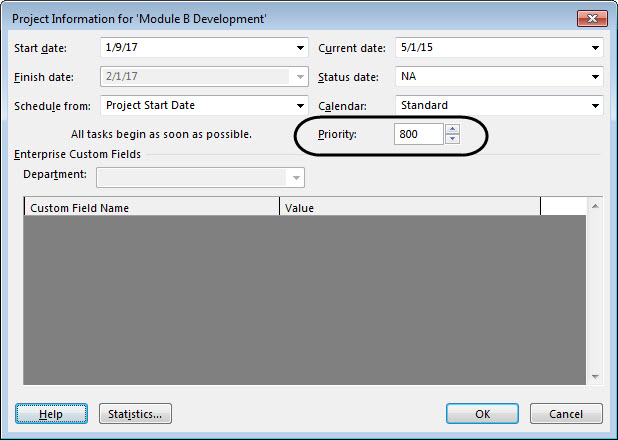
4. In the Project Information dialog, select a number in the Priority field that represents a High priority project. For example, you might set the Priority value to 800 such as shown in the following figure.
5. Click the OK button.
6. Save the project changes.
7. Open the medium-priority project.
8. Repeat steps #3-6 to set the Priority number for a Medium priority project, such as 600 for example.
9. Open the low-priority project.
10. Repeat steps #3-6 to set the Priority number for a Medium priority project, such as 400 for example.
The key to setting the Priority number for each project is to enter the highest value for the highest priority project, and the lowest value to the lowest priority project, without entering the same number for any two projects.
Level Cross-Project Overallocations
After setting the Priority number for each project, the final step in the process is to level cross-project overallocations. To do this, complete the following steps:
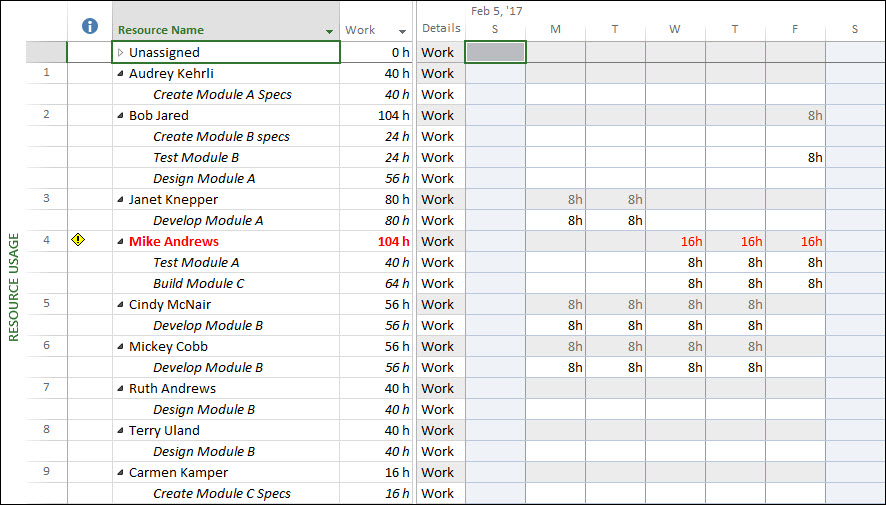
1. In any one of the open projects, apply the Resource Usage view. With multiple projects open, the Resource Usage view shows every resource in every open project, along with every task assignment for every resource. Notice in the following figure that Mike Andrews is overallocated across two projects.
2. Right-click on the Work column header and select the Insert Column item on the shortcut menu.
3. On the list of available fields, select the Project field.
4. Widen the Project column as needed, and drag the split bar to the right of the Work column. Using the Project column, you can determine the projects containing the tasks assigned to the overallocated resource, such as shown in the following figure.
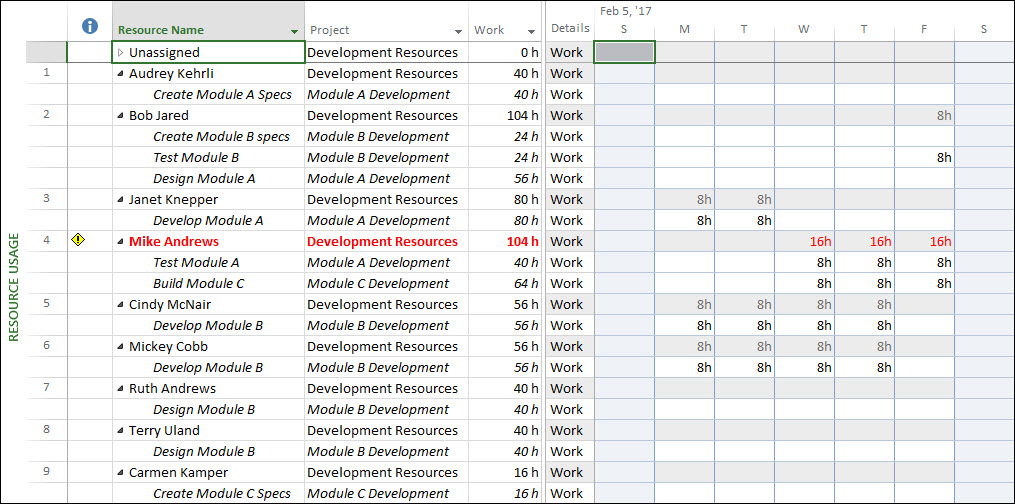
Note: In addition to the Project column, you may also want to insert the Task Summary Name column as well. The Task Summary Name column will show you the name of the closest summary task for each task assignment shown in the Resource Usage view.
5. Select the name of the first overallocated resource whose cross-project overallocation you want to level.
6. Click the Resource tab to display the Resource ribbon.
7. In the Level section of the Resource ribbon, click the Level Resource button. Microsoft Project displays the Level Resource dialog shown in the following figure.

8. In the Level Resource dialog, click the Level Now button to level the overallocations for the selected resource across all open projects using the Priority number you specified for each project.
9. Repeat steps #7-8 for each overallocated resource.
10. Save and close each open project.
Did this blog post help you? Would you like to learn more about how to effectively use Microsoft Project, Microsoft Project Server, or Project Online to manage your projects? If so, please consider scheduling a private training class for your project managers, taught by one of our expert trainers from EPMA. And don’t forget to follow us on Twitter, LinkedIn, and Facebook.
For more details & kick start your project management journey, sign up for our Microsoft Training Classes or send us an email.
I hope you find this blog post helpful. For more tips and tricks on Project Management, please visit www.epmainc.com

