Background
When I first started using Microsoft Project 2010 over 5 years ago, I struggled with the new Ribbon feature. In the 2010 version of the software, Microsoft replaced the familiar menus and toolbars with the new Ribbon feature because their software developers were running out of space using the existing menus and toolbars. I struggled with the new Ribbon feature, however, because the software required me to go back and forth between ribbons to find the commands I needed to use regularly. For example, I was forever bouncing back and forth between the Task ribbon, the Resource ribbon, and the View ribbon to find the commands I needed to use.
I finally figured out that I could make my life easier by placing frequently used commands on the Quick Access Toolbar, which would eliminate some of the need for bouncing back and forth between ribbons. In this blog post, let me show you how to customize the Quick Access Toolbar in Microsoft Project 2010 or 2013, along with recommendations on the commands you might want to add to your own Quick Access Toolbar.
Customize the Quick Access Toolbar
To customize the Quick Access Toolbar in Microsoft Project 2010 or 2013, complete the following steps:
1. Click the File tab and then click the Options tab in the Backstage.
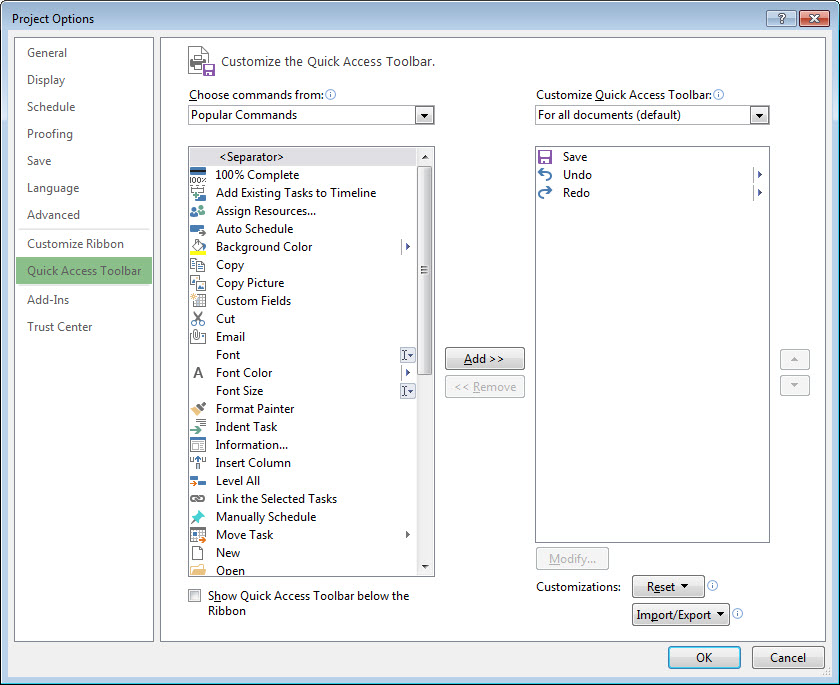
2. In the Project Options dialog, click the Quick Access Toolbar tab on the left side of the dialog, as shown in the following figure.

Note: The fastest way to display the Project Options dialog with the Quick Access Toolbar page displayed is to right-click on either the Quick Access Toolbar or the Ribbon and then to select the Customize Quick Access Toolbar… item on the shortcut menu.
3. In the upper left corner of the dialog, click the Choose commands from pick list and select the All Commands item, as shown in the following figure.
4. In the Customize Quick Access Toolbar list on the right side of the dialog, select the location below which you want to add a new button. For example, if you want to add a button after the Redo button, select the Redo button.
5. In the Choose commands from list on the left side of the dialog, select a command and then click the Add>> button.
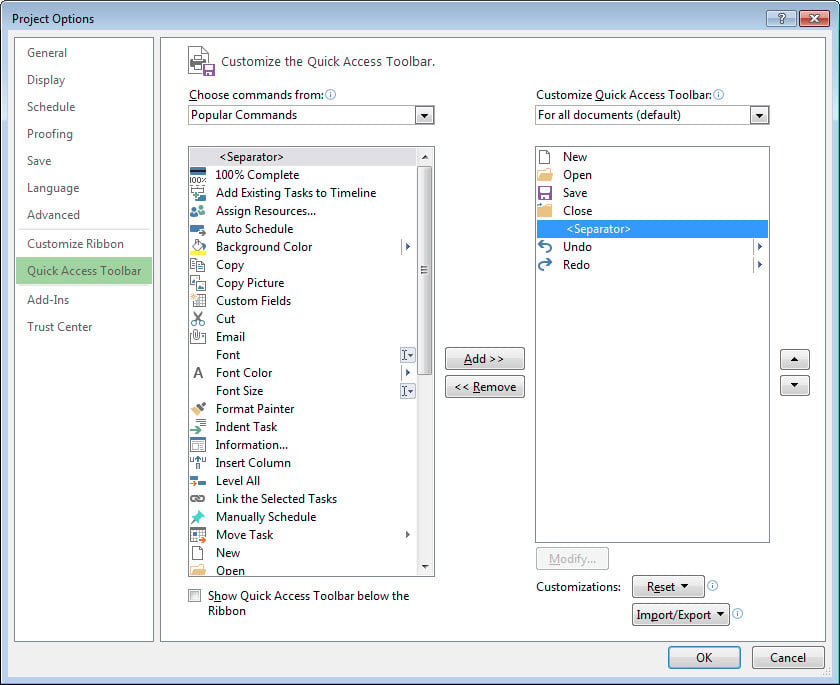
6. To add a separator between commands to break the commands into sections, select the <Separator> command at the top of the Choose commands from list and then click the Add>> button.
7. To move a command to a different location in the Customize Quick Access Toolbar list, select the command and then click the Move Up or Move Down buttons as needed.
The following figure shows the after adding the New, Open, Close, and <Separator> commands to the Customize Quick Access Toolbar list, and after moving the Close command below the Save command.

8. To move the Quick Access Toolbar below the Ribbon, select the Show Quick Access Toolbar Below the Ribbon checkbox in the lower left corner of the dialog.
9. Click the OK button when finished.
The following figure shows the Quick Access Toolbar below the Ribbon in Microsoft Project 2013, customized with the commands I use most frequently.

Recommended Commands for the Quick Access Toolbar
You might consider adding the following commands to the Quick Access Toolbar in your own copy of Microsoft Project 2010 or 2013:
- New
- Open
- Save
- Close
- <Separator>
- Page Setup
- <Separator>
- Undo
- Redo
- <Separator>
- Link the Selected Tasks
- Unlink Tasks
- <Separator>
- Assign Resources…
- <Separator>
- Zoom In
- Zoom Out
- Zoom Selected Tasks
- Zoom Entire Project
- <Separator>
- Scroll to Task
If you are a Project Server 2010 or 2013 user, you might also want to add the following additional commands to your Quick Access Toolbar as well:
- Save for Sharing
- Publish
- Work Offline
- Cleanup Cache
- Build Team from Enterprise
Did this blog post help you? Would you like to learn more about how to effectively use Microsoft Project, Microsoft Project Server, or Project Online to manage your projects? If so, please consider enrolling in one of our upcoming open enrollment training classes.
You can take our training classes “in person” in our EPMA training center in Houston, Texas or “live-virtual” over the Internet. And don’t forget to follow us on Twitter, LinkedIn, and Facebook.
For more details & kick start your project management journey, sign up for our Microsoft Training Classes or send us an email.
I hope you find this blog post helpful. For more tips and tricks on Project Management, please visit www.epmainc.com

