Using Cost Rate Tables
Mickey Cobb is a project team member for projects in the DaleCo organization. As a project team member, she can work in three different roles, and each role carries a different cost rate. You can see her roles and cost rates in the following table.
| Role | Cost Rate |
| Support (Help Desk) | $100/hour |
| Consulting | $150/hour |
| Technical Training | $200/hour |
In a typical project, Mickey Cobb can function in one, two, or all three of these roles. In a situation such as this, how can you set up multiple cost rates in Microsoft Project? The answer is to set up and use Cost Rate Tables for the resource. In the preceding situation, I must complete the following steps to specify multiple cost rates for Mickey Cobb:
1. Open a project in which Mickey Cobb is a team member.
2. Click the View tab to display the View ribbon.
3. In the Resource Views section of the View ribbon, click the Resource Sheet button to apply the Resource Sheet view.
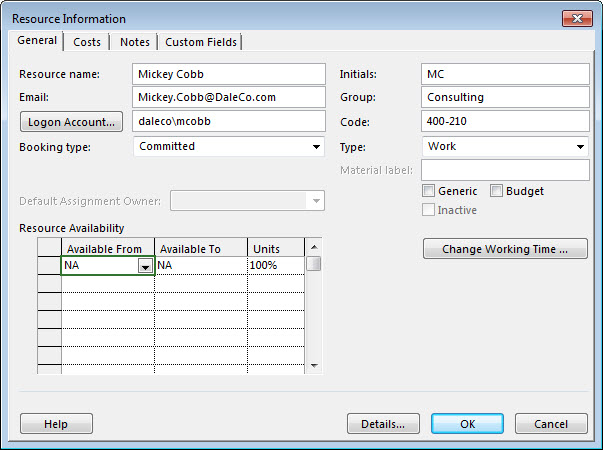
4. Right-click on the name, Mickey Cobb, and then select the Information item on the shortcut menu. Microsoft Project displays the Resource Information dialog for the selected resource, such as the one shown in the following figure.
5. In the Resource Information dialog, click the Costs tab. Microsoft Project displays the Costs page of the dialog, such as the one shown in the following figure.
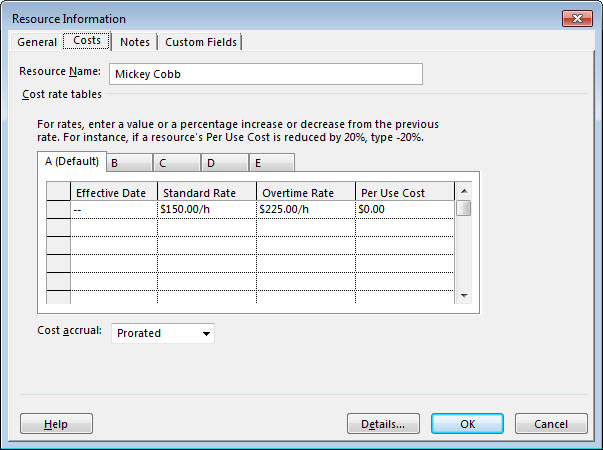
On the Costs page of the Resource Information dialog shown in the previous figure, notice that I specified $150/hour as the default cost rate for Mickey Cobb. Remember that this is her cost rate for consulting work, which is the primary type of work that she performs in projects. Notice also that the Costs page contains four worksheet tabs labeled A (Default), B, C, D, and E. Each worksheet table is a Cost Rate Table, and you use Cost Rate Tables B – E to specify alternate cost rates for resources.
6. Click the B tab to display Cost Rate Table B.
7. In the data grid, enter the first alternate cost rate in the Standard Rate column, and optionally enter an overtime cost rate in the Overtime Rate column, if needed.
8. Individually select the C, D, and E tabs if needed to specify up to three more alternate cost rates.
Warning: Microsoft Project limits you to only one default cost rate and four alternate cost rates. This means you cannot use more than five cost rates for any resource, no matter which version of Microsoft Project you use.
In this example, I entered the Support (Help Desk) rate of $100/hour on Cost Rate Table B and the Training rate of $200/hour on Cost Rate Table C.
9. Click the Notes tab. Microsoft Project displays the Notes page of the Resource Information dialog.
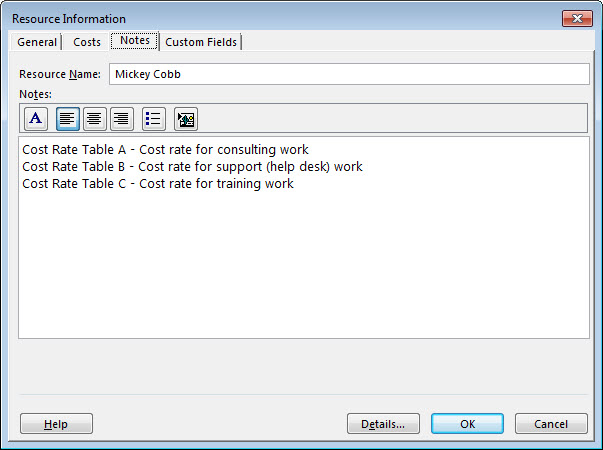
10. On the Notes page of the Resource Information dialog, enter a note to document the purpose of each of the cost rates entered for the resource.
In the following figure, notice how I documented the three cost rates for Mickey Cobb on the Notes page of the Resource Information dialog.
11. Click the OK button to close the Resource Information dialog.
Specifying the Cost Rate Table for Task Assignments
After you enter multiple cost rates for a resource, how do you actually use these cost rates for the resource? I must complete the following steps to apply alternate cost rates to the tasks to which Mickey Cobb is assigned:
1. Assign the resource to tasks in the project, wherever needed.
Note: When you assign a resource to a task, Microsoft Project always initially applies the cost rate from Cost Rate Table A for the task assignment. This is why the label on the A tab is labeled A (Default) in the Resource Information dialog.
2. In the Resource Views section of the View ribbon, click the Resource Usage button to apply the Resource Usage view.
3. In the Data section of the View ribbon, click the Tables pick list and select the Cost table.
4. Right-click anywhere in the timephased grid (timesheet) on the right side of the view and select the Cost item on the shortcut menu.
5. Right-click on the Cost column header and select the Insert Column item on the shortcut menu.
6. In the list of available resource columns, select the Cost Rate Table column.
7. Drag the split bar to the right edge of the Cost column.
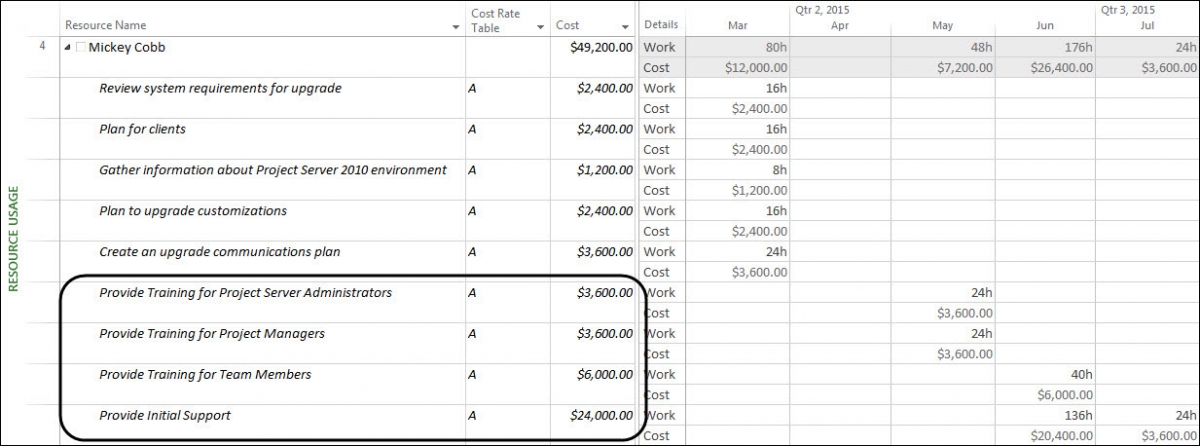
The following figure shows the customized Resource Usage view. Notice the A value in the Cost Rate Table column for each task assigned to Mickey Cobb. Notice also that the last four tasks assigned to her are training and support tasks, which means that I need to change the values in the Cost Rate Table column for these four tasks. Of these four tasks, I need to change the Cost Rate Table value to B for the last task because it is a support (help desk) task, and I need to change the Cost Rate Table value to C for the other three tasks because they are training tasks.
8. Change the value in the Cost Rate Table column for each task as needed.
The following figure shows the Resource Usage view after changing the Cost Rate Table values for the last four tasks. Notice that I changed the Cost Rate Table value to B for the last task because it is a support (help desk) task, and I changed the value to C for the previous three tasks because they are training tasks.
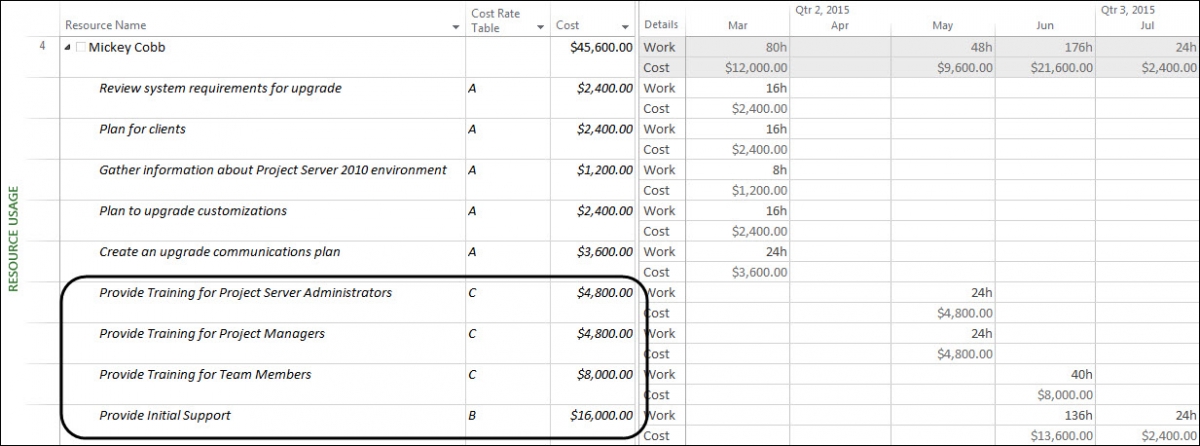
The following table shows the changes to the Cost value for each of the last four tasks after changing the values in the Cost Rate Table column. Notice that the values increased for the first three tasks in the table, while the value for the last task decreased. This is because Mickey Cobb’s training rate is higher than her consulting rate, while her support (help desk) rate is less than her consulting rate.
| Task Name | Previous Cost | New Cost |
| Provide Training for Project Server Administrators | $3,600 | $4,800 |
| Provide Training for Project Managers | $3,600 | $4,800 |
| Provide Training for Team Members | $6,000 | $8,000 |
| Provide Initial Support | $24,000 | $16,000 |
Hungry for more?
Would you like to learn more about how to effectively use Microsoft Project, Microsoft Project Server, or Microsoft Project Online to manage your projects? If so, please consider enrolling in one of our upcoming open enrollment training classes.
You can take our training classes “in person” in our EPMA training center in Houston, Texas or “live-virtual” over the Internet.
…And don’t forget to follow us on Twitter, LinkedIn, and Facebook.

