
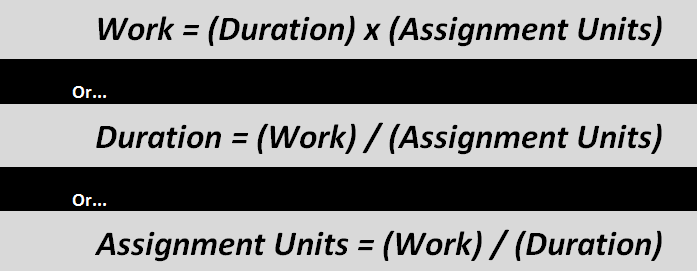
Within Microsoft Project there are various ways to assign resources to tasks within a project schedule. In my opinion there is no right way to assign resources. However, using the right method will allow you to assign resources and plan the assignment correctly and efficiently. I am going to discuss three methods of assigning resources as well as discuss the benefits of using each particular method. The three methods that I will cover in this blog are; using the ‘Resource Names’ column, using the ‘Assign Resources’ dialogue box, and using the ‘Task Form’ split view. Each of these methods will assign resources to tasks however; each method will yield different results. Before we start assigning resources to tasks it’s important that we understand the ‘Assignment Planning Variables’ within Microsoft Project. When assigning resources to tasks we need to be aware of the following criteria: · Work:The number of hours of real work effort spent performing the task. · Duration:The amount of working time between the start and finish dates of the task. · Assignment Units: The percentage of the resource’s typical workday spent on the task. This diagram explains how these three variables interact with each other:
Of the three variables in the assignment equation, one of them always needs to remain fixed to enforce the mathematical integrity of the relationship: · Fixed Work: Microsoft Project attempts to hold the Work of a task fixed. · Fixed Duration: Microsoft Project attempts to hold the Duration of a task fixed. · Fixed Units: Microsoft Project attempts to hold the Assignment Units of a task fixed. If you want to change an assignment (i.e. you want to adjust the Work, Duration, or Assignment Units), then Microsoft Project will hold one of the three assignment variables fixed and recalculate the remaining variable in the equation. The default Task Type is ‘Fixed Units’ (This default setting can be changed from ‘Project Options’ in the backstage). However; using ‘Fixed Units’ is a good start as in general most PM’s assign people at 100% units unless they specify otherwise. When assigning a resource to a task using ‘Fixed Units’, the scheduling engine will look at the duration of the task and calculate the ‘Work’ using 100% units as a default, this is a result we are likely to want. We now understand how these planning variables work so we can start assigning resources to tasks. Using the ‘Task Form’ to assign resources In the ‘Split View’ section of the ‘View’ Ribbon I am going to check the ‘Details’ checkbox (by default the ‘Task Form’ is selected, if not; select the ‘Task Form’ from the drop down menu next to the ‘Details’ checkbox). You should then see the split view below: 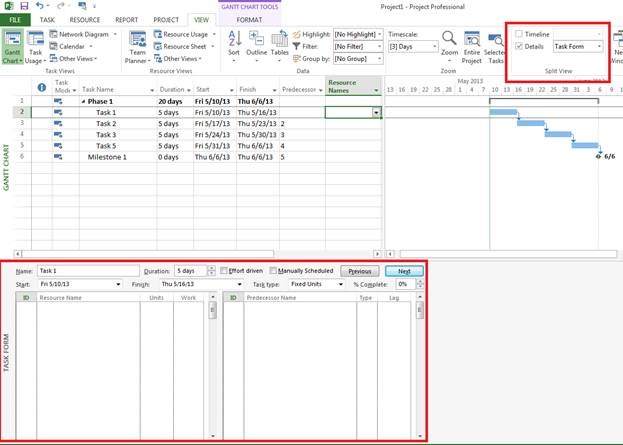
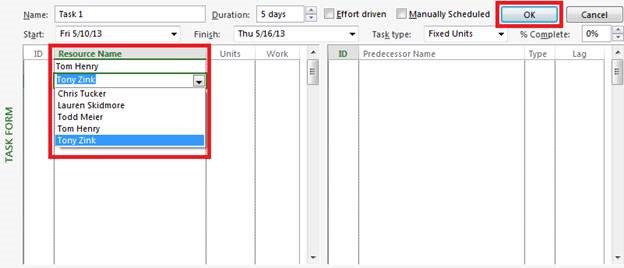
The benefit of using the Task Form to assign resources is that it is possible to adjust the ‘Units’ and ‘Work’ for each assignment. You can also change to the ‘Task Type’ to fix the ‘work’, ‘duration’ or ‘units’ all within the same form. To assign resources click in the ‘Resource Name’ column within the ‘Task Form’ then click the ‘OK’ button.
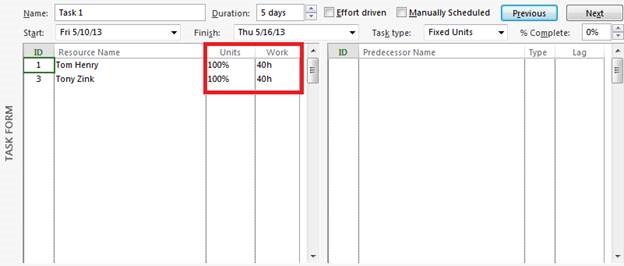
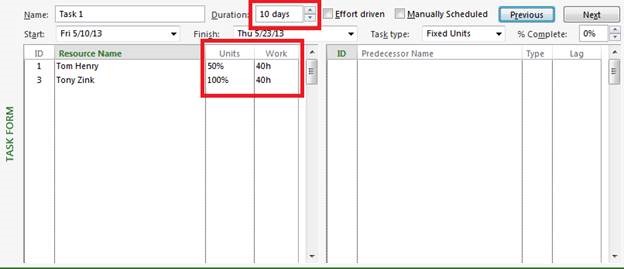
We can now see that the ‘Units’ and ‘Work’ are populated.
Using the task form I can now adjust the ‘Units’ and the ‘Work’. I am going to adjust the assignment for ‘Tom Henry’ and have him work 50% units on this task. The units are fixed (default) so the duration is increased to 10 days to accommodate the work that ‘Tom Henry’ has been given since he is only working 4 hours per day.
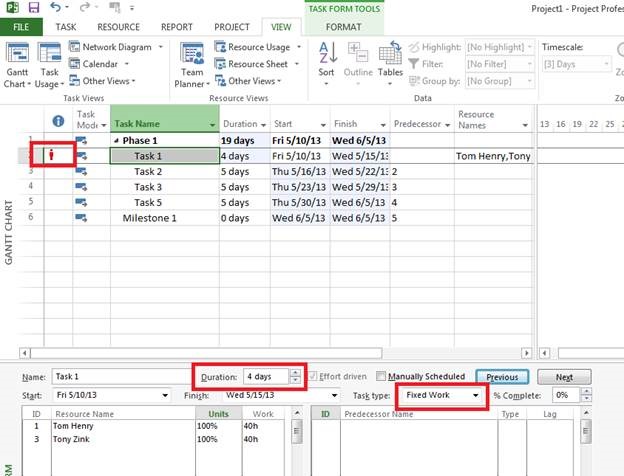
I am now going to fix the work by selecting ‘Fixed Work’ from the ‘Task Type’ dropdown box.

I am now going to decrease the Duration of the task from 5 to 4 days; because the 40 hrs work (which is fixed) can’t be completed within the 4 day duration and the resources become over allocated. If this task was ‘Fixed Units’ the work would have been reduced to 32 hours. This is a good example of how these assignment planning variables interact with each other.
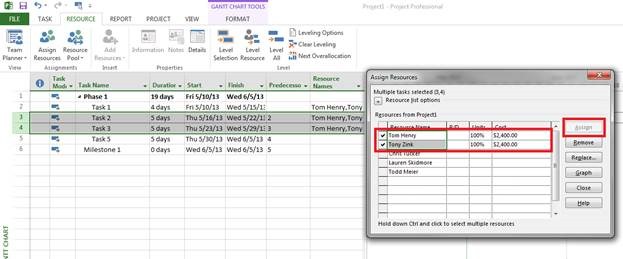
Benefits of using the ‘Task form’: We have full control over ALL assignment variables and can adjust individual assignments. I am now going to use the ‘Assign Resources’ Dialogue box to assign resources to tasks. One of the benefits of using the Assign Resources dialogue box is the ability to assign multiple resources to one or many tasks at the same time. I am now going to assign ‘Tom Henry’ and ‘Tony Zink’ to ‘Task 2’ and ‘Task 3’: In the ‘Assignments’ section of the ‘Resource’ ribbon click on the ‘Assign Resources’ button. The ‘Assign Resources’ dialogue box will appear, highlight the task(s) that you want to assign resources to. In the ‘Assign Resources’ dialogue box highlight the Resource(s) you want to assign to the task then click ‘Assign’. You will see the assigned resources have a checkmark on the left hand side; you are able see the cost incurred by the assignment and the assignments units. At this time you can adjust the assignment units (but not the work).
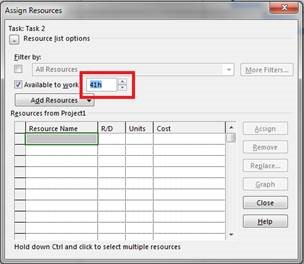
You can also filter your resources from within the ‘Assign Resources’ dialogue box. For example, I want to find a resource that is available to work on ‘Task 3’ which is a 40 hour task. I can filter for an available resource using the ‘Available to Work’ filter within the Assign Resources dialogue box. The Filter will look at the resources availability and their current workload to analyze if they are available to work on the selected task for the duration of task.

When the ‘Available to Work’ hours are increased to 41 hours there are no longer any resources available due to the fact that all the resources in my project team observe a 40 hour week.
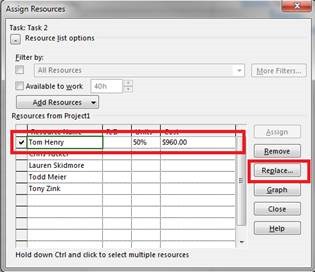
Another key benefit of the ‘Assign Resources’ dialogue box is the ability to ‘Replace’ assignments on a project schedule. ‘Tom Henry’ is working on Task 2 at 50% units and has 16 hours of work. If I want to swap out this resource for another resource, keeping the assignment planning variables, this can be done by using the ‘Replace’ Feature. From the ‘Assign Resources’ dialogue box select the resource that you want to replace and click the ‘Replace’ button.
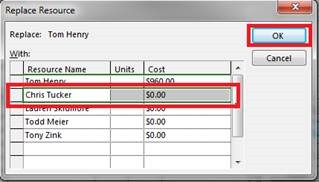
The ‘Replace Resource’ dialogue box will appear; select the resource that you want to replace ‘Tom Henry’ and click ‘OK’.
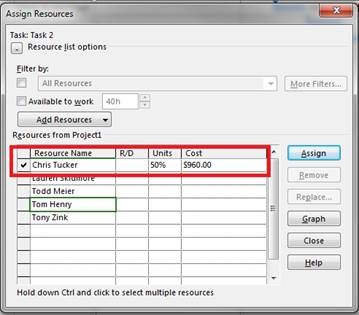
You can now see that the assignment planning variables have been carried forward and ‘Chris Tucker’ has been assigned at 50% units.
Benefits of using the ‘Assign Resources’ method: We can assign single or multiple resources to single or multiple tasks. We can filter resources. We can replace resource assignments and carry through assignment planning variables. Using the ‘Resource Names’ column to assign resources. In the default ‘Gantt Chart’ View you will find the ‘Resource Names’ Column in the table (you may need to move the vertical splitter bar to reveal it). If you click in the column you will get the drop down menu that will allow you to select resources from your project team. 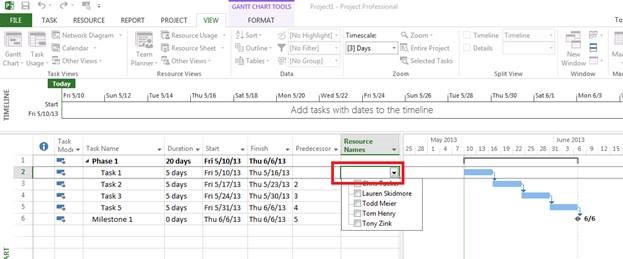
If you check the checkbox by the resources you want to add to the task they will be assigned to the task.
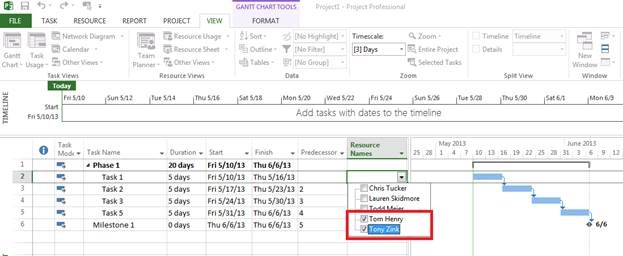
Assigning resources using the ‘Resource Names’ column will assign resources to tasks at 100% units. The default task type is ‘fixed units’ the resource will be assigned 40 hours’ work as the duration is 5 days. As I am assigning two resources to this task the total work for ‘Task 1’ will be 80 hours. Note: In using this method there is no option to adjust the Work or units for the individual assignment. Benefits of using the ‘Resource Names’ column method It is quick and easy to assign or un-assign one or many resources. Thanks for reading! I hope this blog helps you to some level. It is by no means a comprehensive guide to assigning resources but it should give you a few pointers.
Please feel free to leave your comments.
GAIN VISIBILITY WITH PPMVUE
Bring your Project Online data to life with PPMVUE.
Create dashboards and reports for Portfolios, Projects and more in few clicks. Ready to use out of the box and works with any configuration
Download From Office Store Learn More